Gifting a telescope December 9, 2020
Posted by aquillam in Astronomy.add a comment
So you think you might want to give someone a telescope for the holidays, and you don’t know where to start. Well, you’ve come to the right place. Of course, my first piece of advice is to consider binoculars instead.
Binoculars are great. They’re easy to use, and don’t require any accessories. They’re also super useful for all sorts of other things, like bird watching, sporting events, or opera (though really, good astronomy binoculars are a bit bigger than opera glasses!) A good pair of 7×35 binoculars can hang on the hook next to the door, so they’re ready for use in 10 seconds. They’re easy to carry on a hike, or stick in the glove box or carry-on for travel. They’ll pull in mountains on the Moon or the moons of Jupiter even in the city, and if you find someplace dark, they’re easy enough to hold to be able to spot the beehive cluster in winter or M13 in the summer. Add in a tripod bracket and lightweight tripod and you’re ready for a tougher challenge, like the rings of Saturn or the ring nebula, still in under 10 minutes.
When looking for binoculars, the first number is magnification, the second is aperture. Magnification makes details easier to see, but without aperture there won’t be any details. Aperture determines how much light the binoculars (or telescope) can collect. The more light, the brighter and more detailed your image. Usually though, he want to be able to hold binoculars. The bigger the aperture, the heavier the binoculars get. I recommend sticking to something 10 x 50 or smaller, unless you use a tripod.
But, if you’re sure you want a telescope, the most important thing is to get something they’ll use. Nothing beats trying out a scope before you buy it. Check with your local library, since many have telescope loaner programs. Or get in touch with your local astronomy club to see if they have a beginners night. If you’re lucky, you might even have a camera or hobby shop that carries good telescopes. Of course, in the time of Covid, anything in-person is hard. Checking places that do reviews, like Sky and Telescope magazine or the https://www.cloudynights.com/ forums is a great place to find out if a ’scope is worthwhile.
For a starter ’scope, you want something lightweight but sturdy, quick to set up, and easy to point. There are few things more frustrating than watching Jupiter zip randomly through the field of view because the telescope won’t stay steady.


I really like tabletop newtonian telescopes as a starter. These telescopes have a mirror in the bottom to collect the light. The mirror is usually 3 or 4 inches in diameter, and that size is what determines the aperture. I’ve used a Celestron FirstScope and found the views were decent, and the ’scope was easy to use and sturdy enough to do some traveling. Orion and Meade make similar telescopes which also get good reviews. I recommend getting a small folding table to go with it. To use these telescopes, you basically set it on the table and push the tube around to point it. There are no frills, no bells and whistles. You’ll need to know you way around the sky to really use it, but you won’t break the bank on it either. I’m still using the 4″ tabletop ’scope I got for Christmas 40 years ago! Expect to spend $50 – $100.

A slightly bigger newtonian style telescope is called a Dobsonian. These are meant to sit on the ground. They’re easy to use and give you a lot of bang for your buck. However, they take up a lot of space and they’re unwieldy to move. They’ll also require some periodic maintenance, called collimation, to keep all the elements aligned and the view looking good. On the other hand, you can often find used ones in the Cloudy Nights classifieds! Orion made these popular, but all three companies make good versions. Several companies also make dollies for these so if you can store it someplace where you don’t need to move it over high door sills or up and down steps you can really get a lot of aperture for the money. I recommend starting with a 6 or 8 inch, with a focuser that accepts 2”wide eyepieces. A used 6” can be found for $200, and there really isn’t an upper limit.
You’ll find Newtonian style telescopes with tripods in the 3 – 6” size too. However, the tripods are often flimsy or hard to use, and I haven’t found one that I could recommend.
I’ve also checked out a few 60 and 70mm refractors, but a 3 – 4 inch mirror is so much better than a 2 -3 inch lens that I can’t recommend a small refractor. The one exception is the Galileoscope, which I love as a teaching tool. It comes completely disassembled, and can be used as an optical bench, if you want to experiment with the lenses. Really, its a nice optics science kit that can be assembled into a mediocre telescope. If you’re willing to spend $200 – $300, Orion and Celestron make nice refractors in the 80 – 90mm aperture size. Meade also makes them, and usually for a little less money, but I’ve found their tripods to be flimsy, with sharp edges. You might be able to find a Meade telescope without a tripod, then find a better mount, but that’s probably more effort than you want to put in. Or look for one that is closer to the $300 mark, and gets good reviews.
Those companies also make some entry-level go-to telescopes. Go-to is the term for a mount that will automatically move the telescope to the target for you. I’d be wary of any of those that cost less than $500, even used. They can be rather tedious to set up and align, and some of the control parts can’t be replaced when they become outdated. There’s also “Push-to”, which is where there is some device that will tell you which way to move the telescope. These are usually add-ons you install yourself. They’re popular with Dobsonian owners, and are an economical way to get a telescope that will tell you where you should point.
There are other companies out there too. You’ll find Tasco and Bausch & Lomb in department stores and even drug stores. They’re usually ’scopes to avoid. There are also several companies that make really fantastic telescopes, but are much more expensive. There’s even a company here in Michigan, Planewave, that makes stunning telescopes on ingenious mounts, but way outside my price point! Orion, Celestron and Meade make high end telescopes as well. Once you’re looking at those, you’re net looking at a starter ’scope anymore, and it’s probably not going to be a good gift unless you have input from the person you’re buying it for.
Writing good discussion prompts July 8, 2020
Posted by aquillam in teaching.Tags: active_learning, community of learning, learner-centered, Learning, learning community, online instruction, peer_instruction, teaching
add a comment
This post assumes you’ve read my previous post, creating effective and engaging discussions.
Numerous studies have shown that students learn best when they learn socially. Learners retain more information and are better able to synthesize it, recognize assumptions, challenge misconceptions, and utilize it in novel or creative ways if they interact with other students. In distance or blended learning classes, the asynchronous discussion forum is often the tool of choice for facilitating social learning. However, simply creating a discussion board is not enough. You need to help them build their learning community, which requires both social presence and cognitive engagement. Students need to see each other as real people, with an emotional presence in the class. If they think they matter to their peers, they are more likely to be willing to do the extra work of really engaging with their peers over the material. The rules you set and the involvement you take help to determine how involved the students will be, but you can also use prompts that encourage diverse thinking, and the sharing of ideas. The level of the prompts largely determine the level of cognitive engagement. Read more about creating effective and engaging discussions here, or check the resources at the end. I’ll focus on constructing the prompts below.
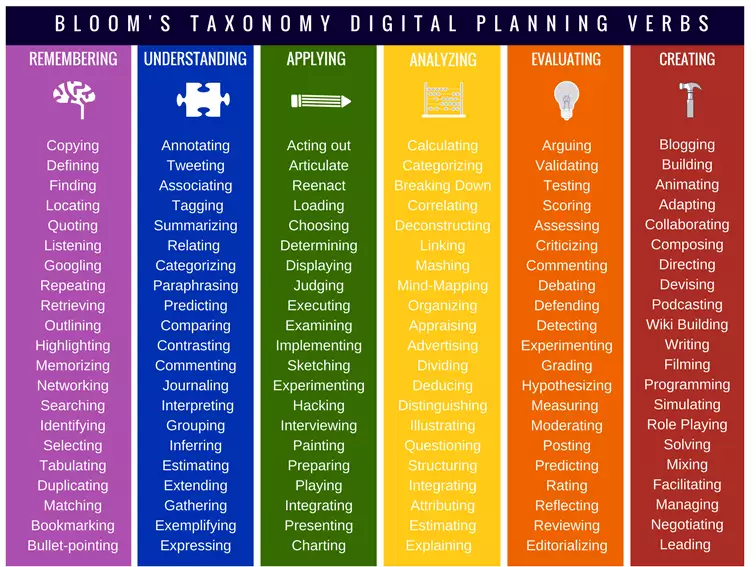
Good discussion prompts should guide students toward higher order cognitive skills by facilitating discussion. Remember, the goal is to get students to have a conversation with each other, not to respond to the primary prompt. Bloom’s taxonomy (see below) lists the order of cognitive skills as: remembering, understanding, applying, analyzing, evaluating, and creating. When grappling with new knowledge, students tend to focus on the recall and understanding steps, but those can be assessed with something like an auto-graded quiz. The point of the discussion is to get them to engage more deeply.
You may be able to write a single prompt that will ask them to analyze or evaluate, or you may need a scaffolded set of prompts to build toward those higher levels. Don’t forget your prompt needs to be structured in such a way that it encourages conversation, like limiting the number of people who reply directly to the prompt, so they have to reply to each other. These prompts take careful crafting to work well, but usually take less intervention to keep them going.
You may also want to consider a structured type of prompt, such as problem solving, project based, or debate prompts. These more structured types often lead to both greater involvement (as determined by the number of posts) and higher levels of cognition (as determined by the level of skill shown in the post content.) However, these also usually require more attention on the part of the instructor. A debate, for example, may require a thread for the initial brainstorm of ideas, followed by group assignment and facilitation of group discussions to develop a group argument, and finally moderation of the class debate. Consider how many students you have, how many GSIs can help you, and whether you can remove some other assessment (maybe the debate replaces a homework assignment.) If you can manage the workload, the enhanced student engagement is well worth it.
So now that you have some idea about the different types of prompts, let’s talk about formulating the prompts.
Every prompt (every piece of work, really), should be relevant to what you want students to get out of your class, so start by considering your learning goals. What learning goals do you want covered by this discussion? What outcomes would show you that they have achieved those goals? What outcomes involve higher level skills? If you were to have a conversation with friends or family about that outcome, what would it look like, and how might it start? Are there open questions or ideas up for debate? Could it be posed as a problem to be solved? Does it connect to a larger class project? Should the students have enough information when the prompt is posted to be able to generate a conversation? These questions should give you the foundation for designing your prompt(s).
A standard structure for discussions is to require a response to the original prompt, plus two responses to peer’s posts. That works well for small classes or group discussions, and has a nice structure if you have different deadlines for the original replay and the peer responses. However, in a large class, that quickly becomes unwieldy for both you and the students. Offer them options, like responding to your prompts or to their peers, from the beginning. For example, ask a “what do you know, what do you want to know” question and give students the option to reply to a previous response with expansion or clarification of the knowledge, related questions, and thoughts about how to answer the questions. If the conversation lags, or if it isn’t at the level you want, you can join it by asking your own questions. “I see many people want to know more about [topic]. Why is that interesting to you? What knowledge do you think you’ll need? What have you learned that made you think of that?”
Prompts with multiple requirements dependent on prior responses are useful for scaffolded discussions. Brainstorming, or general invitation questions are good starting points. They activate prior knowledge and get students started sharing ideas. However, those types of prompts generally don’t illicit much interaction on their own, and their cognitive level is down there at the bottom of Bloom’s taxonomy. They tend to illicit a lot of “I totally agree, I like [thing] too!” peer responses. You can push the level up by asking for value judgments or consensus, then ask for solutions or next steps. For example, “Due Tuesday: If you are one of the first 10 people to respond, post a challenge to accomplishing [thing] and explain what makes it a challenge. If there are already 10 responses, pick the response that you think poses the greatest challenge and explain why you think it is the greatest challenge. Due Friday: look at other people’s responses to what poses the greatest challenge, and pick one that you don’t agree with. Explain how you think that challenge can be overcome. Alternatively, respond to the responses to your earlier post.” By staging the steps in the original prompt, you’re laying out the plan, so students can prepare to write their responses. You’re also enforcing interaction by requiring that most of the responses actually be responses to students, not to you. Finally, you’re giving them some autonomy, by offering them options around how to engage.
Open-ended prompts with a variety of reasonable responses are the most likely to engage higher level thinking. Prompts that ask students to reflect on course material and incorporate it to make some sort of judgement seem to be the most effective at achieving higher level thinking. You can help generate the sense of community by asking students to reflect on other posts. Follow that up again by asking them to respond to the people who responded to their posts. Make sure the discussion ties in to the course by matching it to the learning goals, or by using it as the foundation for other assignments. You might use a prompt like the previous example to assign groups for a project to come up with solutions to the challenges, or vote on which challenge is the biggest and set up a debate for whether or not we should try to overcome the challenge.
You can also use the prompts to drive students to help each other out. Set up a standing, non-required discussion for “it’s in the syllabus” questions and encourage its use (you can refer to it, send students there when they ask questions appropriate for it, give extra credit for students who are helpful, thank the extra helpful ones…) Set up homework or exam review threads. For example, a week (or more) before the exam, ask students for the three most difficult problems, then ask them to help each other out. Or ask them to try and write exam questions, but specify that they have to be higher on Bloom’s taxonomy than recall or understanding. Give them topic headings and ask them to fill in what they know.
Most discussion boards will allow you to set up groups, including an option for groups of 1. If you want to use a more formal prompt type, you’ll likely want to take advantage of that. For example, if you want the class to hold a debate, you’ll need to break them into teams. You might also break them into groups to tackle a problem. For example, if you give them a really big challenge, like getting humans to Mars, you might start with a brainstorm/ biggest challenge post for the whole class, then split them into groups to tackle one individual challenge per group, then bring them back together again to make sure their solutions aren’t conflicting. You can even use discussion boards to mimic think-pair-share, or 1-2-4-all (think-pair-small group-full class sharing) techniques. One person groups offer the opportunity for journaling or metacognitive questions: “Compare your first two posts and most recent two posts. Which ones show the highest level cognitive engagement? How do you judge that? What was it about that post that engaged you on that level? Do you think this discussion board is helping you improve your critical thinking skills?”
Finally, a good prompt will be transparent, and accommodating. If you supply your students with the course learning goals, the prompt should tell them what goals you hope to reach with this discussion prompt. It should tell them what sources you expect them to pull from (book chapter(s), links to reading materials…) Requirements, including deadlines and formatting, should be clear. Provide links to services they might need (e.g. if they’re likely to want video, include links to the video and captioning how-tos). Check your prompt for accessibility standards.
And, don’t forget to keep a document somewhere with the prompt and any notes, like whether or not it was good, or needed improvement. Future you will thank you for it!
Resources
- Discussions–not-every-student-needs-to-make-an-original post (LSA-Tech Learning & Teaching)
- Stanford: Designing Effective Discussion Questions https://teachingcommons.stanford.edu/resources/teaching/student-teacher-communication/designing-effective-discussion-questions
- Discussion Prompts https://topr.online.ucf.edu/discussion-prompts/
- “Strategies for Creating a Community of Inquiry through Online Asynchronous Discussions” deNoyelles, Zydney and Chen, 2014 https://pdfs.semanticscholar.org/6458/638f623c4e7c7d792724cf44e932f679a1fa.pdf
- “Designing Effective Question Prompts to Facilitate Critical Thinking in Online Discussions”
- Bloom’s Taxonomy https://www.teachthought.com/learning/what-is-blooms-taxonomy-a-definition-for-teachers/
- Meaningful and Manageable Canvas Discussions and Assignments (LSA-Tech Learning & Teaching)
Creating effective and engaging online discussions June 24, 2020
Posted by aquillam in Science, teaching.Tags: active_learning, community of learning, online instruction, teaching, tools_for_collaboration
add a comment
With links for Canvas Discussions and Piazza where appropriate
As we prepare for fall semester, I’ve been creating some documentation for my department. Occasionally, people outside my department find these useful, so I thought I’d blog them too.
It’s been well established that students understand and retain more from classes where they are able to engage with their peers. Additionally, working with large and diverse teams is a necessary life skill (and one employers value), so it’s well worth including as a learning goal for your class. However, building a community of learning poses a special challenge in the online classroom. Many instructors turn to the discussion board as the tool for community building. As with all tools, how you use it matters.
If you want your students to engage with the discussion board, the first thing you need to do is establish its value. The obvious way to do that is by assigning points to it. There is some evidence to suggest that assigning points at the beginning of the class is valuable, especially during the period of group formation. However, if you set a fixed requirement (e.g. five good posts), most students will fulfill that requirement and stop. Also, if the stakes are too high, students become more concerned with matching the rubric than in genuine interactions. An alternative to points might be badges (support for Badgr for Canvas), but so far most students don’t place a high value on digital badges. To build a community, you need to share with students why you’re asking them to engage with each other. Whether you simply tell them what the research says or share the research literature and citations is up to you (see links at the end for a few of these.) Best practice may be to include points for discussion board posts with the first few assignments, but not make the discussion board a distinct element for graded assessment, and remind them of the purpose regularly. This gives them the motivation to get started, but keeps the focus on social learning over assessment.
Once you’ve established why you want them to participate, you need to establish the expectations for how to participate. Providing clear guidelines can help you avoid some of the major pitfalls, and provide guidance for students who may be anxious about group work online. There are three things you really need to do: establish the rules of engagement, be present (but not too present), and make it manageable.
First and foremost, layout the ground rules. For example, tell them they need to write complete sentences, no personal attacks, no taking over the conversation, and no lurking. Give them examples of good posts and bad posts. How often have we seen the interaction that looks like “I totally agree with <student>. I love <fill in the blank>. I really like what they said about liking <fill in the blank>.” That’s a great interaction with copy-paste, and maybe makes <student> feel validated, but it’s not engaging with the material or furthering the conversation. Also, make sure that they know what good behavior looks like. Respondnig to someone with “that argument sounds stupid to me” really isn’t any better than “that’s a stupid idea.” Think about what you would expect of them if they were actually in class. How would you react to any of the above interactions in the classroom? Give them that guidance up front. Also, if you are going to assign points to the discussion, especially if you’ll have them do peer evaluation, provide them with a rubric. In Canvas, you can connect the rubric to a graded discussion. Best practice is to make it fairly generic so you can use the same rubric for every post. You may want to pin the instructions and rubric to the top of the discussion board. Adding a rubric to a graded discussion in Canvas, pinning a post in Canvas, pinning a post in piazza.
You need to be present regularly, and let them see that you are there. Establish times when you’ll be online, and times when you won’t respond. Establish expectations such as when and how often they should post, whether or not they should expect you to respond, and when they should expect to respond to each other. Again, think of what you would do in person. If the students are having a good conversation, keep out of it. If the conversation is faltering, give it a push.
If you have a very large class, you may need to break it into groups to make the conversations manageable – discussion section sized rather than lecture sized. This is especially helpful if GSIs will be grading, or if you want students to always respond to the primary prompt. Creating group discussions in Canvas Creating groups in Piazza. It can also be helpful for you to show them how to adjust their settings. Some discussion boards default to emailing participants every interaction. You want them to be active on the discussion board, not buried under email! how to adjust settings for Canvas discussion boards How to adjust settings in Piazza
Using an icebreaker in a discussion board is valuable. It’s the first post, so it establishes how the board will work. It helps students get to know who else is in the class, and you can use it to help students find peers with similar goals, or to find peers with different skills. Require both a primary post and a couple responses to other students. You should call out particularly good interactions and illustrate why they’re good interactions. Model the behavior yourself. Respond to several students as if you were one of the group, trying to further the conversation. In short, participate in the icebreaker the same way you expect them to participate in the regular class discussion.
Put discussion board participation on the course calendar, and send reminders the same way you would for any other assignment. Treat it like a required part of the course even if you aren’t assigning points to it. For Canvas Discussions, make it graded or check the “Add to Student to-do” box. For Piazza, create a calendar event in Canvas and link to Piazza Check for students who aren’t participating, and follow up with them. If they have some challenge that limits their participation, do what you can to address the issue. Reiterate your reasoning for using a discussion board and its importance to the class.
Keep in mind that plain text is not always the best tool. This is especially true if students need to do math or artwork. Go ahead and type the formula for the volume of a sphere in plaintext, you’ll see what I mean! Many discussion tools allow alternative posting options such as images, video, or files. The more flexible you can be, the more willing some students will be to participate. Make sure to model and respond to these posts yourself.
It’s a lot easier for students to simply respond to your post, rather than interacting with peers. But you’re trying to build a community, not hold 100 personal conversations on the same topic. Force them to interact with each other by having a cut off, like 6 hours, or 5 posts, after which instead of responding to your prompt, they have to respond to their peers’ responses. Provide them with guidance, or you’ll end up with the “I like what you like” non-conversation again. Have them make value judgments, such as which response has the most important issue or hardest problem and why. Or have them look for the response that generates a new question, and respond with that question, or see if you can answer someone’s question. Make it clear that the goal is always to add something new to the conversation. Ask them to assess whether or not their response lends itself to more conversation, or stops it.
Once you’ve established how to use the discussion board, it’s time to start teaching with the discussion board. Consider if you were meeting them in class, what would you want their interactions to look like? How would you guide them toward a genuine discussion in person? If there is a good conversation going, keep out of it. If the conversation stalls, add a new prompt. Don’t be afraid to let the conversation wonder. Remember, this is the space for students to explore with each other. Let them follow their curiosity, at least as long as it doesn’t devolve into a discussion of weekend plans. If it seems appropriate, you can give accolades in the discussion board, but again don’t interrupt the conversation. If you want to acknowledge a student’s work but don’t want to interrupt, you can always send a private message or email them. Similarly, if someone behaves inappropriately, or makes a mistake, you may want to PM/email them, unless a public reprimand really is what’s called for.
Writing a good discussion prompt is a whole other conversation, so I’ll save that for a new post.
Below are some good references and further reading on using discussion boards.
Amanda Page and Miriam Abbott. A Discussion About Online Discussion. https://www.facultyfocus.com/articles/online-education/discussion-about-online-discussion/
Mark Lieberman. Discussion Boards: Valuable? Overused? Discuss. https://www.insidehighered.com/digital-learning/article/2019/03/27/new-approaches-discussion-boards-aim-dynamic-online-learning
The links in the following include the UM library proxy encoding. You may need to be logged in through the library for the links to work.
Delaney D, Kummer T, Singh K. Evaluating the impact of online discussion boards on student engagement with group work. British Journal of Educational Technology. 2019;50(2):902-920. doi:10.1111/bjet.12614.
Kwok-Wing Lai (2015) Knowledge construction in online learning communities: a case study of a doctoral course, Studies in Higher Education, 40:4, 561-579, DOI: 10.1080/03075079.2013.831402
de Castro, V.B., Sridharan, B., Watty, K. and Safari, M. (2020), The impact of learner engagement on performance outcomes: a longitudinal study in accounting education. Account Finance. doi:10.1111/acfi.12640
Please don’t unfriend me April 8, 2020
Posted by aquillam in Astronomy.Tags: NaPoWriMo
add a comment
I'm sorry I missed our lunch
But I read this article today
From Facebook
About de stressing
By getting rid of all
The people who stress
You out unnecessarily.
You know the ones -
They show up in your feed
'Cause once
3 years ago
You had a conversation
In the comments
Of a friend of a friend
You used to know
But you've kinda
Lost touch since
They stopped using Facebook.
But this friend of a friend of a friend
Liked this aggregator
5 years ago
So Facebook thought
You should check out
The latest story it has
And
I was reading it and
I started to wonder
Which of my friends
Thought it was a good enough
Article to share?
But I can’t figure that out.
So I have missed our lunch
And I am starting to wonder
If it was shared by a friend
Or if it was Facebook...


Its A.I.


Trying to warn me
That I have become
That person
The one who stresses other people out.

